How to Save a New Filter
To get started with saving filters, first navigate to your Messaging Inbox, which is the central hub where all your customer conversations are managed.
From your application dashboard, open the Messaging Inbox section where you can view all conversations across channels such as SMS, WhatsApp, and other messaging platforms. This inbox displays all incoming and outgoing interactions in one unified view, allowing you to efficiently track, respond to, and manage conversations.
The Messaging Inbox is the starting point for applying filters, organizing conversations, and creating saved filter views. Ensure you are on the main inbox screen where the conversation list is visible before proceeding to apply filters.
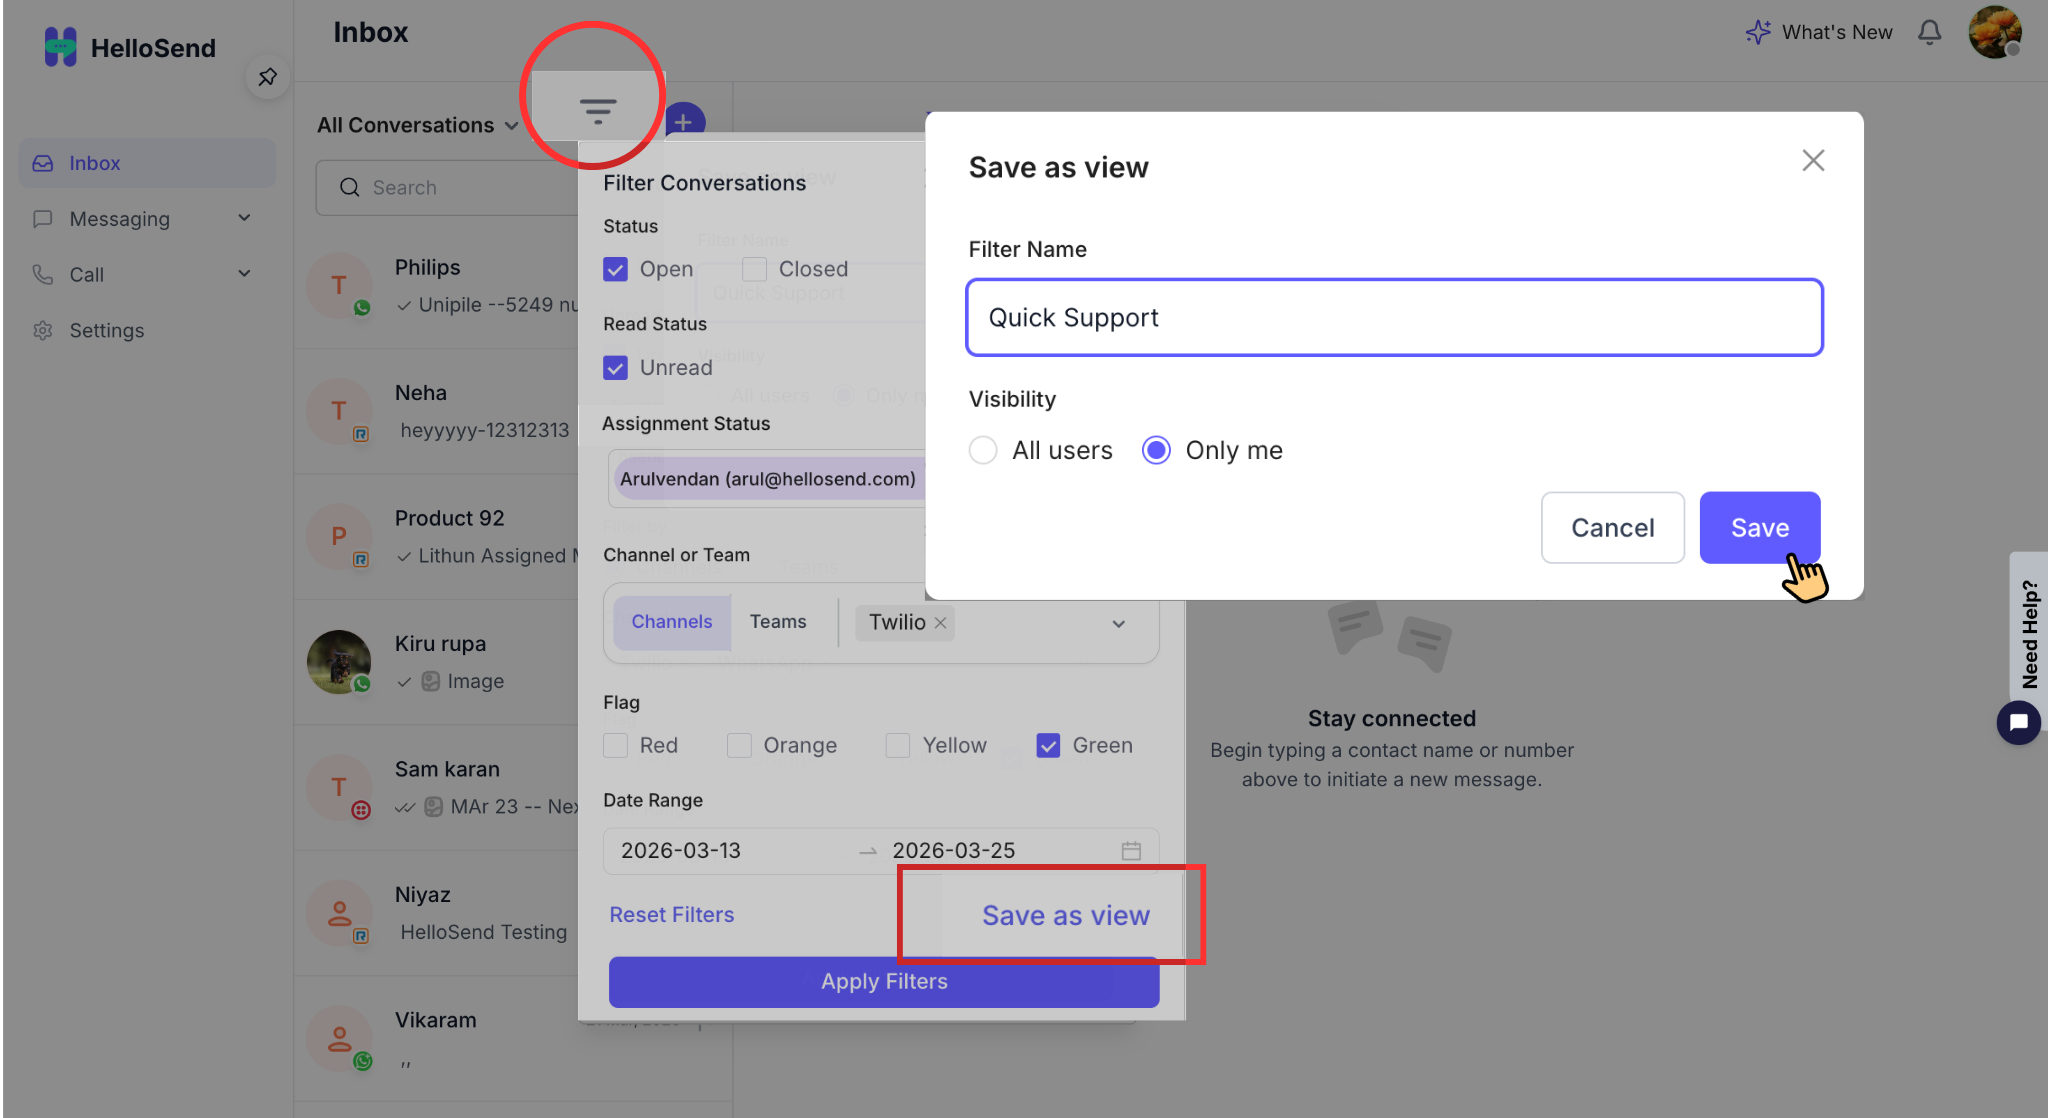
Once you are in the Messaging Inbox, use the Inbox Filter menu to narrow down conversations based on your specific requirements. Filtering helps you focus on the most relevant conversations by organizing your inbox using criteria such as Status (Open, Closed, Unread), Assignment Status(Unassigned, Assigned to Users, Assigned to Teams), Tags, Channels, or Date range.
- Status (Open, Closed, Unread) → Filter conversations based on their current state. Open shows active conversations that still require attention, Closed displays completed conversations, and Unread helps you quickly identify messages that have not yet been viewed or responded to.
- Assignment Status (Unassigned, Assigned to Users, Assigned to Teams) → Organize conversations based on ownership and responsibility. Unassigned helps identify conversations that still need an owner, while Assigned to Users and Assigned to Teams allow you to track conversations already allocated to specific users or departments.
- Flags (Red, Orange, Yellow, Green) → Prioritize and visually organize conversations using color-coded flags. Red can indicate urgent or high-priority conversations, Orange for important follow-ups, Yellow for pending attention, and Green for completed or low-priority conversations.
- Channels → Filter conversations based on the communication channel used, such as SMS, WhatsApp, or other connected messaging platforms. This helps teams manage channel-specific communication workflows.
- Date Range → View conversations within a selected time period by filtering messages based on specific dates. This is useful for tracking recent interactions, campaign activity, or historical conversations.
Click on the filter icon or filter dropdown and select one or more conditions to refine your inbox view. As you apply filters, the conversation list will dynamically update to display only the messages that match your selected criteria. This makes it easier to manage high volumes of conversations and quickly identify priority messages..
When filters are active, a dot indicator will appear on the filter icon, visually confirming that a filtered view is currently applied. This indicator helps you quickly recognize that you are not viewing the default inbox and ensures better control over your filtered conversations before saving them as a reusable filter view..
After applying your desired filters and confirming that the inbox displays the correct set of conversations, click the “Save Filter” button located near the active filter section or filter bar.
The Save Filter option allows you to store your current filtered inbox view as a reusable configuration. This ensures you don’t have to manually reapply the same filter criteria every time you access the Messaging Inbox. Whether you are filtering by status, Assignment Status(Unassigned, Assigned to Users, Assigned to Teams), tags, or channels, saving the filter helps streamline your workflow and improves efficiency.
By clicking Save Filter, you initiate the process of creating a saved inbox filter view, which can be quickly accessed later from the Saved Filters list. This is especially useful for teams handling large volumes of conversations, as it enables faster navigation and consistent access to important message segments.
After clicking “Save Filter,” you will be prompted to enter a filter name for your saved view. This name helps you easily identify and reuse the filter later from the Saved Filters list.
Use a clear and descriptive name that reflects the purpose of the filter. For example:
- Urgent Support Tickets.
- Unread Conversations.
- Assigned to Me – High Priority.
A well-defined filter name improves organization and makes it easier for you and your team to quickly locate the right saved filter, especially when managing multiple inbox filter views.
Required: The filter name field is mandatory. If you attempt to save the filter without entering a name, the system will display an error message: "Filter name is required."
The filter will not be saved until a valid name is provided.
When saving your inbox filter, you can define who has access to this saved filter view by selecting the appropriate visibility option. This helps you control whether the filter is for personal use or shared across your team.
You will see the following visibility options:
This option makes the saved filter accessible to all users in your account, helping teams create shared inbox views. It ensures consistent access to filtered conversations. Improves collaboration and organization.
This option makes the saved filter visible only to you. It is ideal for personal workflows, such as tracking your assigned conversations or monitoring specific message segments. By default, “Only Me” is selected, ensuring that newly created filters do not clutter shared workspaces.
Note: “Only Me” is selected by default when creating a new saved filter to maintain a clean and organized shared workspace.
After entering the filter name and selecting the visibility option, click “Save” to complete the process. The system will securely store your saved inbox filter view based on the selected criteria.
Once saved successfully, the filter will immediately appear in the Saved Filters dropdown list, allowing you to quickly access and reuse it anytime without reapplying filters. This ensures faster navigation and a more efficient workflow when managing conversations in your messaging inbox.
Set a Default View
You can set any saved filter to be your default inbox view. This means whenever you open the application, your inbox will automatically load with those specific filters applied.
- Open the Saved Filters dropdown.
- Click the star icon to mark a saved view as your Default View.
- When you log in again, the system will automatically show this starred filter as your default view.
Managing Your Saved Filters
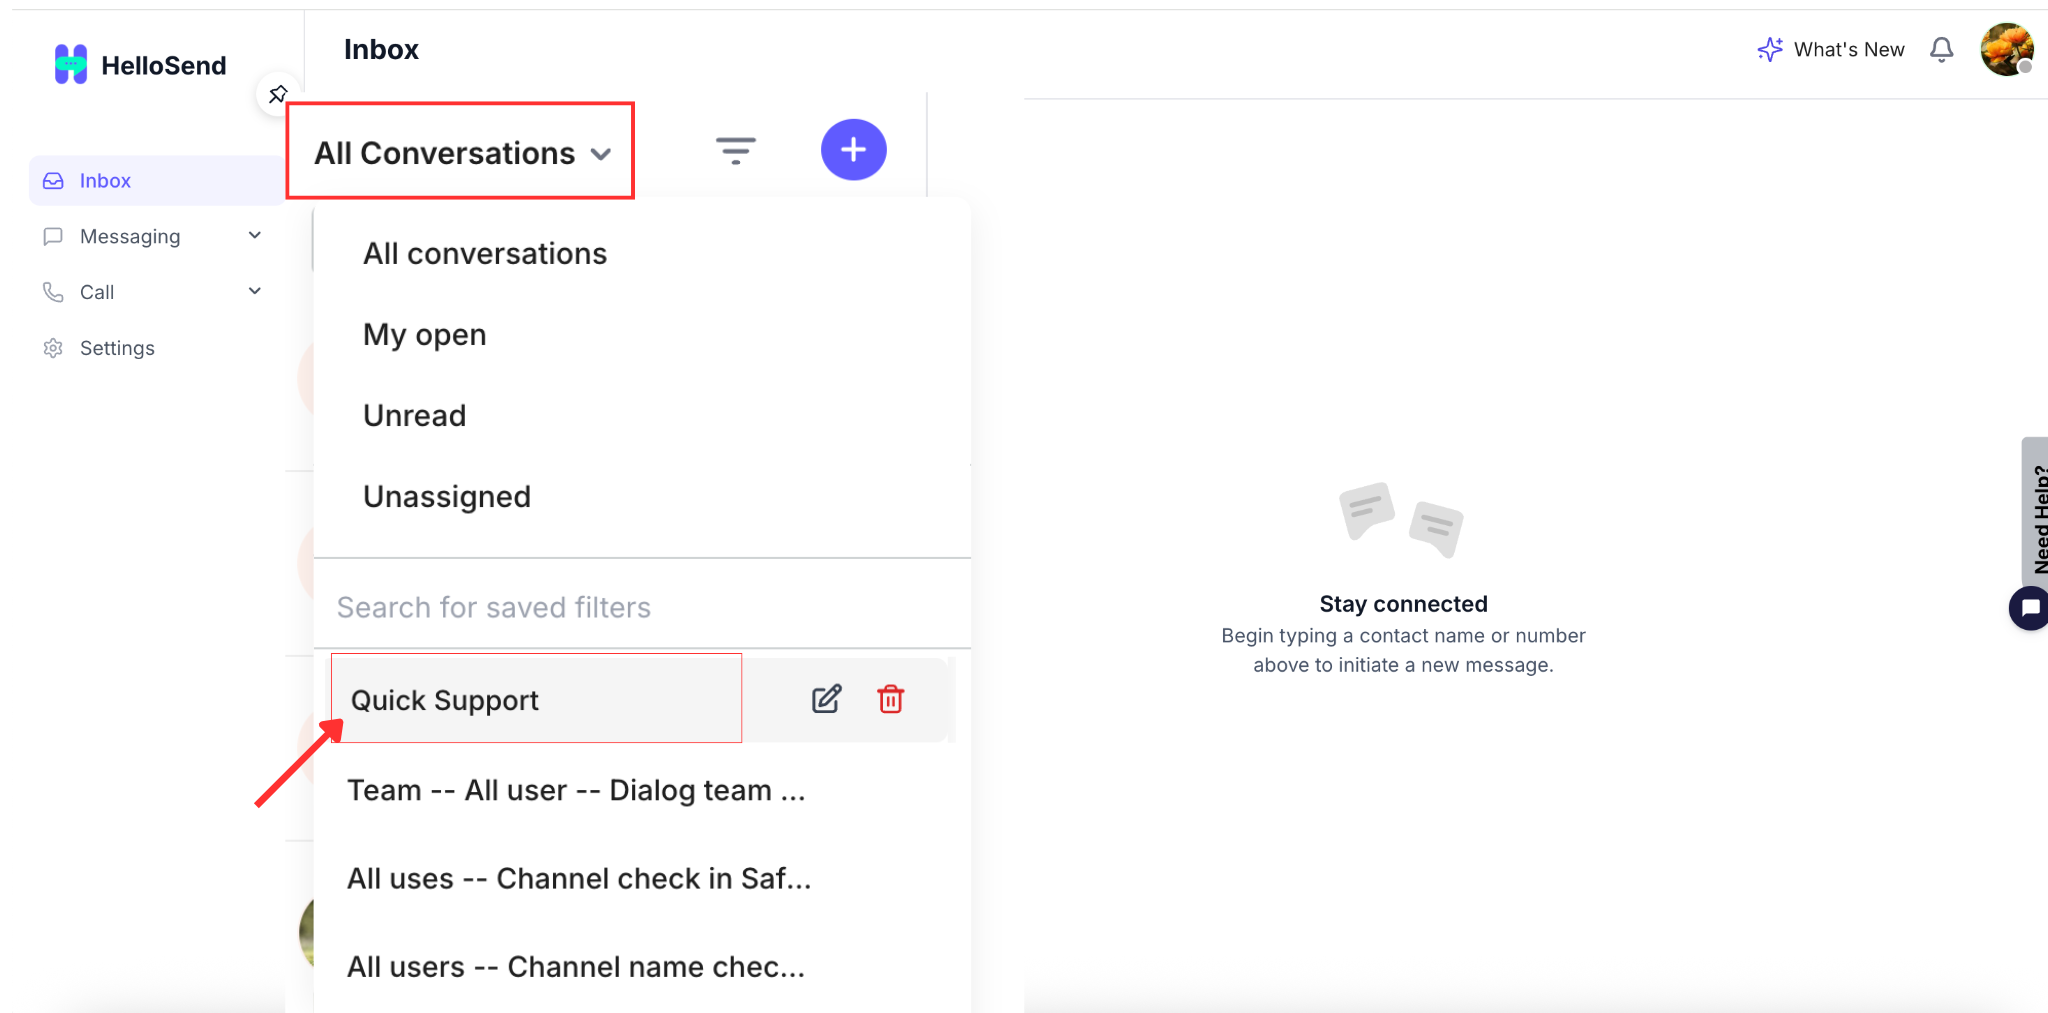
Edit a Saved Filter
Update an existing filter's criteria or rename it.
- Select Edit on an existing saved filter.
- Update the filter name or adjust the filter criteria.
- Click Save changes.
- The updated filter will immediately reflect in the Saved Filters list.
Save as New View
Modify an existing view but save it as a brand new filter.
- Update the criteria of an existing filtered view.
- Click the Save as new view CTA.
- Enter a required filter name for this new view.
- Click Save filter to add it as a new item in your list.
Delete a Saved Filter
If a filter is no longer needed, you can select Delete on the saved filter, confirm the deletion, and it will be permanently removed from the list and no longer accessible.
Search Saved Filters
If you have multiple saved filters, you can easily find the one you need using the search field within the saved filters dropdown.
- Enter a keyword in the saved filter search field.
- Only matching saved filters will be displayed
- And non-matching saved filters should be hidden
Important Behaviors & Rules
Persistence
Saved filters remain available and persist in your list even after you log out and log back in.
Active Indicator
A dot indicator is displayed on the filter icon when a filter is applied. It disappears when cleared.
List Display Limit
Only 5 saved filters are visible initially in the dropdown. A scroll option is enabled to view remaining filters.
Mandatory Naming
Filter names are required. The system will prevent saving and show an error if left empty.
✅ Benefits of Saved Filters
Saved Filters offer several advantages for teams managing large volumes of conversations:
Faster Inbox Navigation – Users can instantly access relevant conversations without repeatedly applying filters, helping them save time and focus on priority messages. By using saved inbox filter views, teams can quickly switch between different conversation segments such as unread, assigned, or high-priority chats, ensuring a smoother and more efficient messaging workflow.
Improved Productivity – Sales and support teams can focus on priority messages such as unresolved conversations, assigned chats, or campaign responses without wasting time sorting through irrelevant data. By using saved filters, teams can streamline their workflow, respond faster, and ensure no important conversation is missed, leading to better efficiency and improved customer engagement.
Consistent Inbox Views – Teams can standardize inbox views across users using organization-level filters, ensuring everyone works with the same set of conversations and priorities. This consistency helps maintain alignment across teams, reduces confusion, and enables better coordination when managing shared inboxes or handling customer interactions collaboratively.
Better Conversation Management – Saved filters help organize conversations based on specific criteria, making it easier to track messages, monitor ongoing interactions, and manage follow-ups effectively. By grouping conversations into meaningful views, users can quickly identify what needs attention, reduce response delays, and maintain a more structured and efficient messaging workflow.
Personalized Workflow – Users can create custom inbox views tailored to their individual workflow needs, allowing them to focus on the conversations that matter most. Whether it’s tracking assigned messages, monitoring specific tags, or prioritizing urgent queries, saved filters help users work more efficiently with a setup that matches their daily tasks and responsibilities.
Conclusion
Saved Filters make inbox management faster, more organized, and more efficient by letting users save and reuse frequently used filter views. Whether you are organizing your own workflow with "Only Me" views or standardizing processes for your team with "Organization" views, this feature ensures you spend less time searching and more time communicating.