Open HelloSend in Microsoft Teams
- Sign in to your Microsoft Teams account using your organization credentials.
- From the left navigation menu in Microsoft Teams, locate and open the HelloSend application. If HelloSend is not visible in the menu, click Apps and search for HelloSend.
- Once the HelloSend application opens, wait for the main dashboard to load. From the HelloSend navigation menu, click Contacts to open the contact management page.
- The Contacts page displays all available contacts in your HelloSend account. From here, you can create new contacts, import contacts, search existing contacts, apply filters, and manage saved segments.
Add Contact
Step 1: Create a New Contact
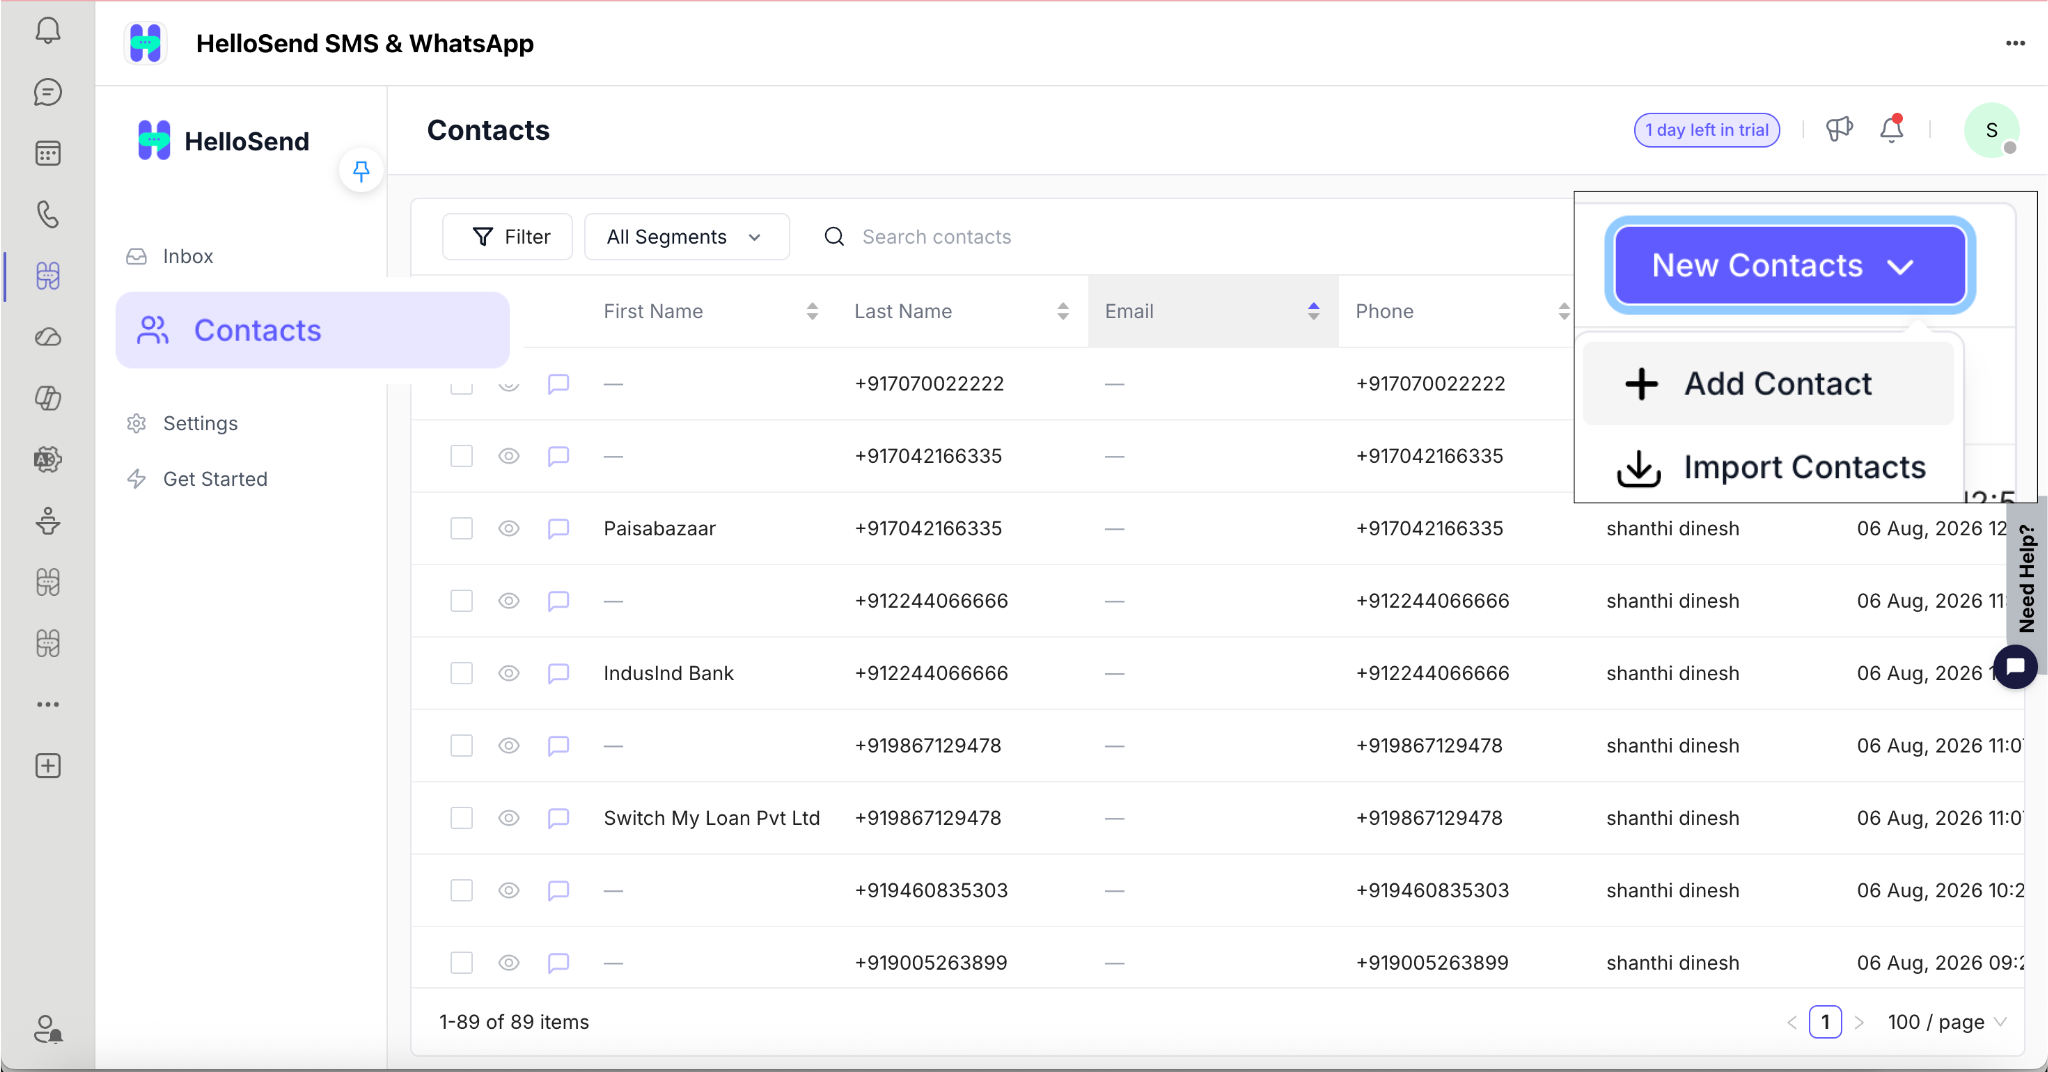
- On the Contacts page, click New Contacts in the top-right corner to create a new contact.
- From the dropdown menu, select Add Contact. This option allows you to create an individual contact manually.
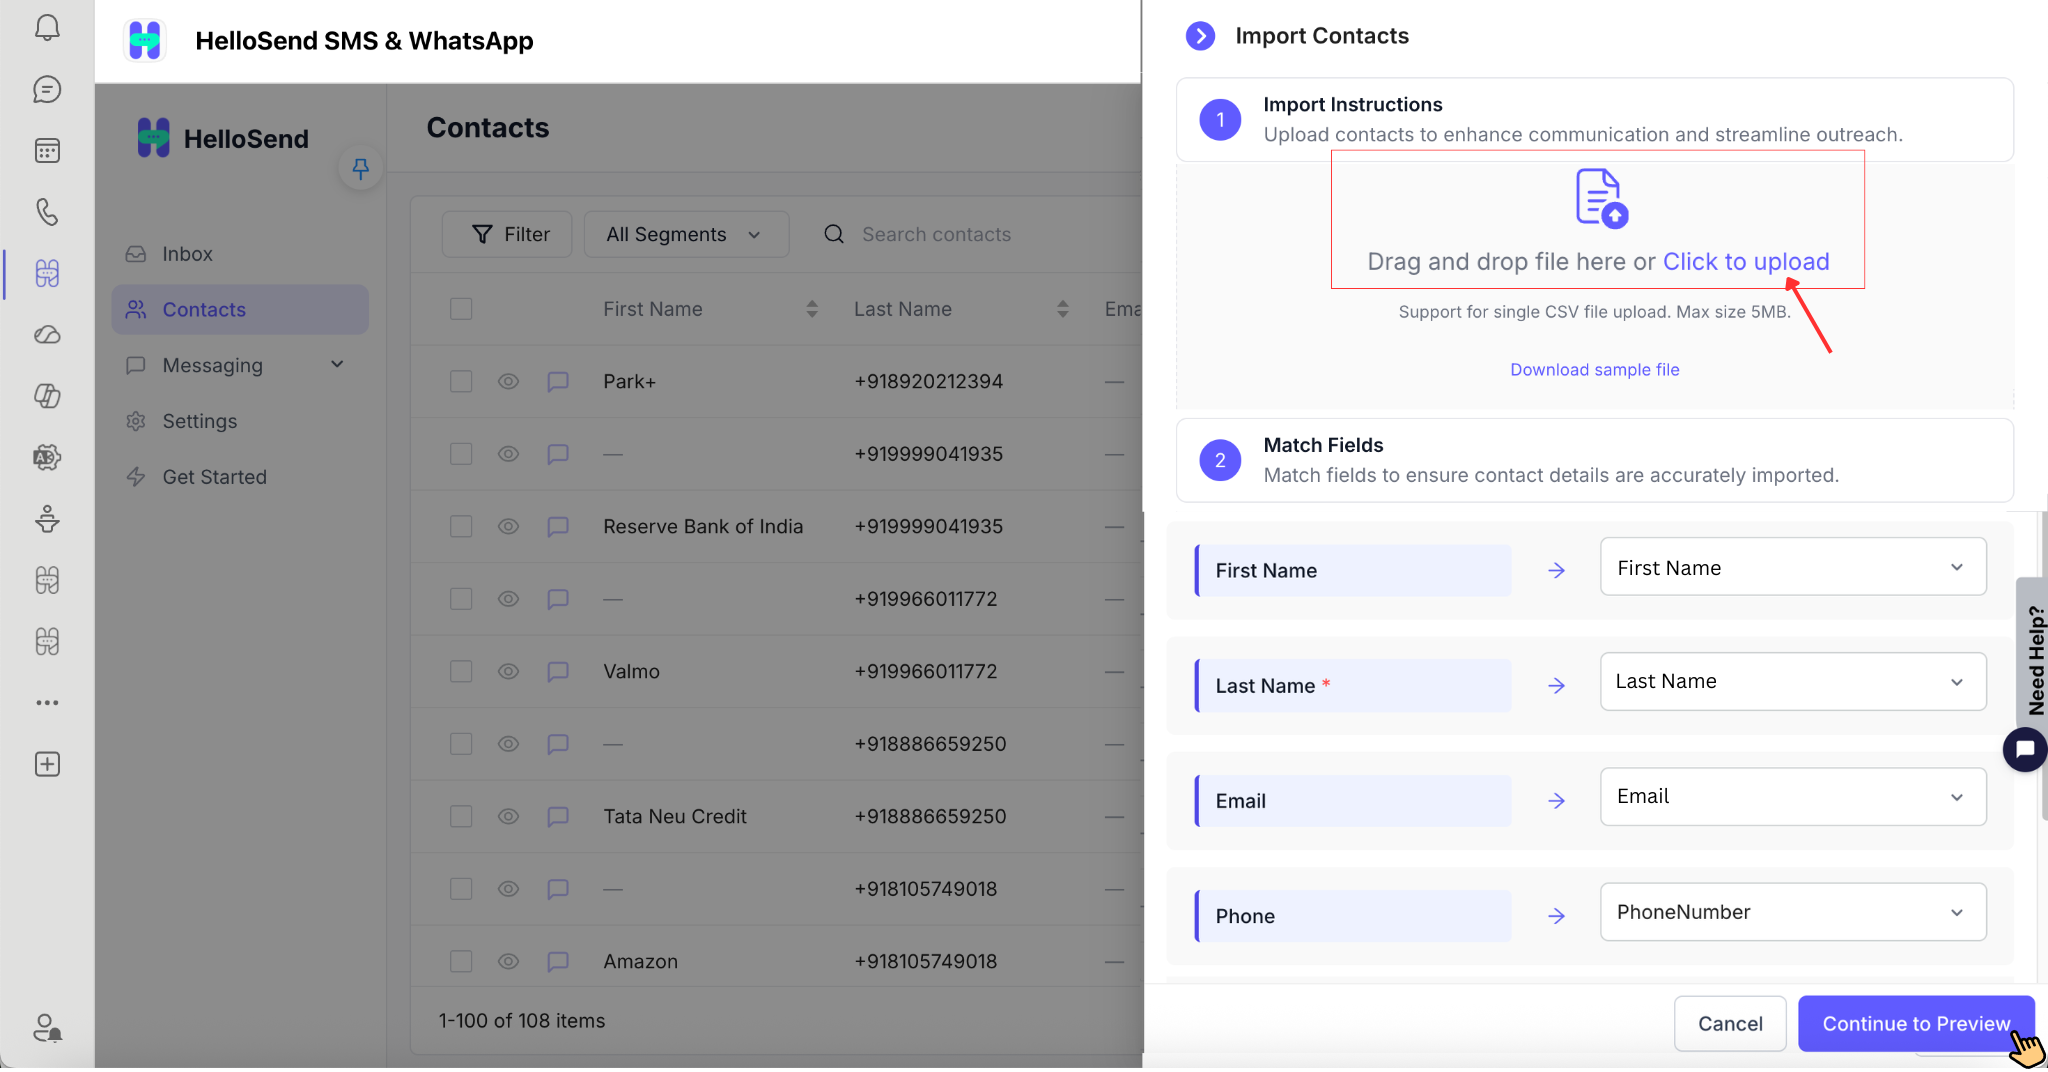
- The Add Contact form will open. Enter the contact's information, including their name, email address, phone number, assigned user, and any additional details required.
- You can also click Add Custom Attribute to include additional business-specific information such as Customer ID, Membership Number, or Preferred Branch.
Step 2: Enter Contact Details
Enter the customer's details in the Add Contact form. The information you provide will be used to identify the contact and enable SMS and WhatsApp communication through HelloSend.
Basic Information
Complete the following fields:
- First Name
- Last Name
- Email Address
- Phone Number
- Assigned To
Example:
+1 555 123 4567
Add Custom Attributes (Optional)
If you need to capture additional information, click Add Custom Attribute .
Enter the following details:
- Attribute Name – Enter a name for the custom field.
- Attribute Type – Choose the appropriate field type.
The following attribute types are available:
- Text
- Number
- Phone
- Date
- Boolean (True/False)
After creating the custom attribute, it becomes available whenever you create or edit contacts, allowing you to store additional information specific to your business.
Example: Customer ID, Membership Number, Vehicle Registration, Purchase Date, or Preferred Branch .
Step 3: Save the Contact
- Review all the information you have entered, including the contact's name, email address, phone number, assigned user, and any custom attributes, to ensure the details are accurate.
- Once you have verified the information, click Save to create the contact.
- HelloSend validates the information and saves the contact to your Contacts list. The contact is then available for searching, filtering, segmenting, and communicating through SMS and WhatsApp.
- If required, you can edit the contact details later from the Contacts page.
Import Contact
Step 1: Import Contact
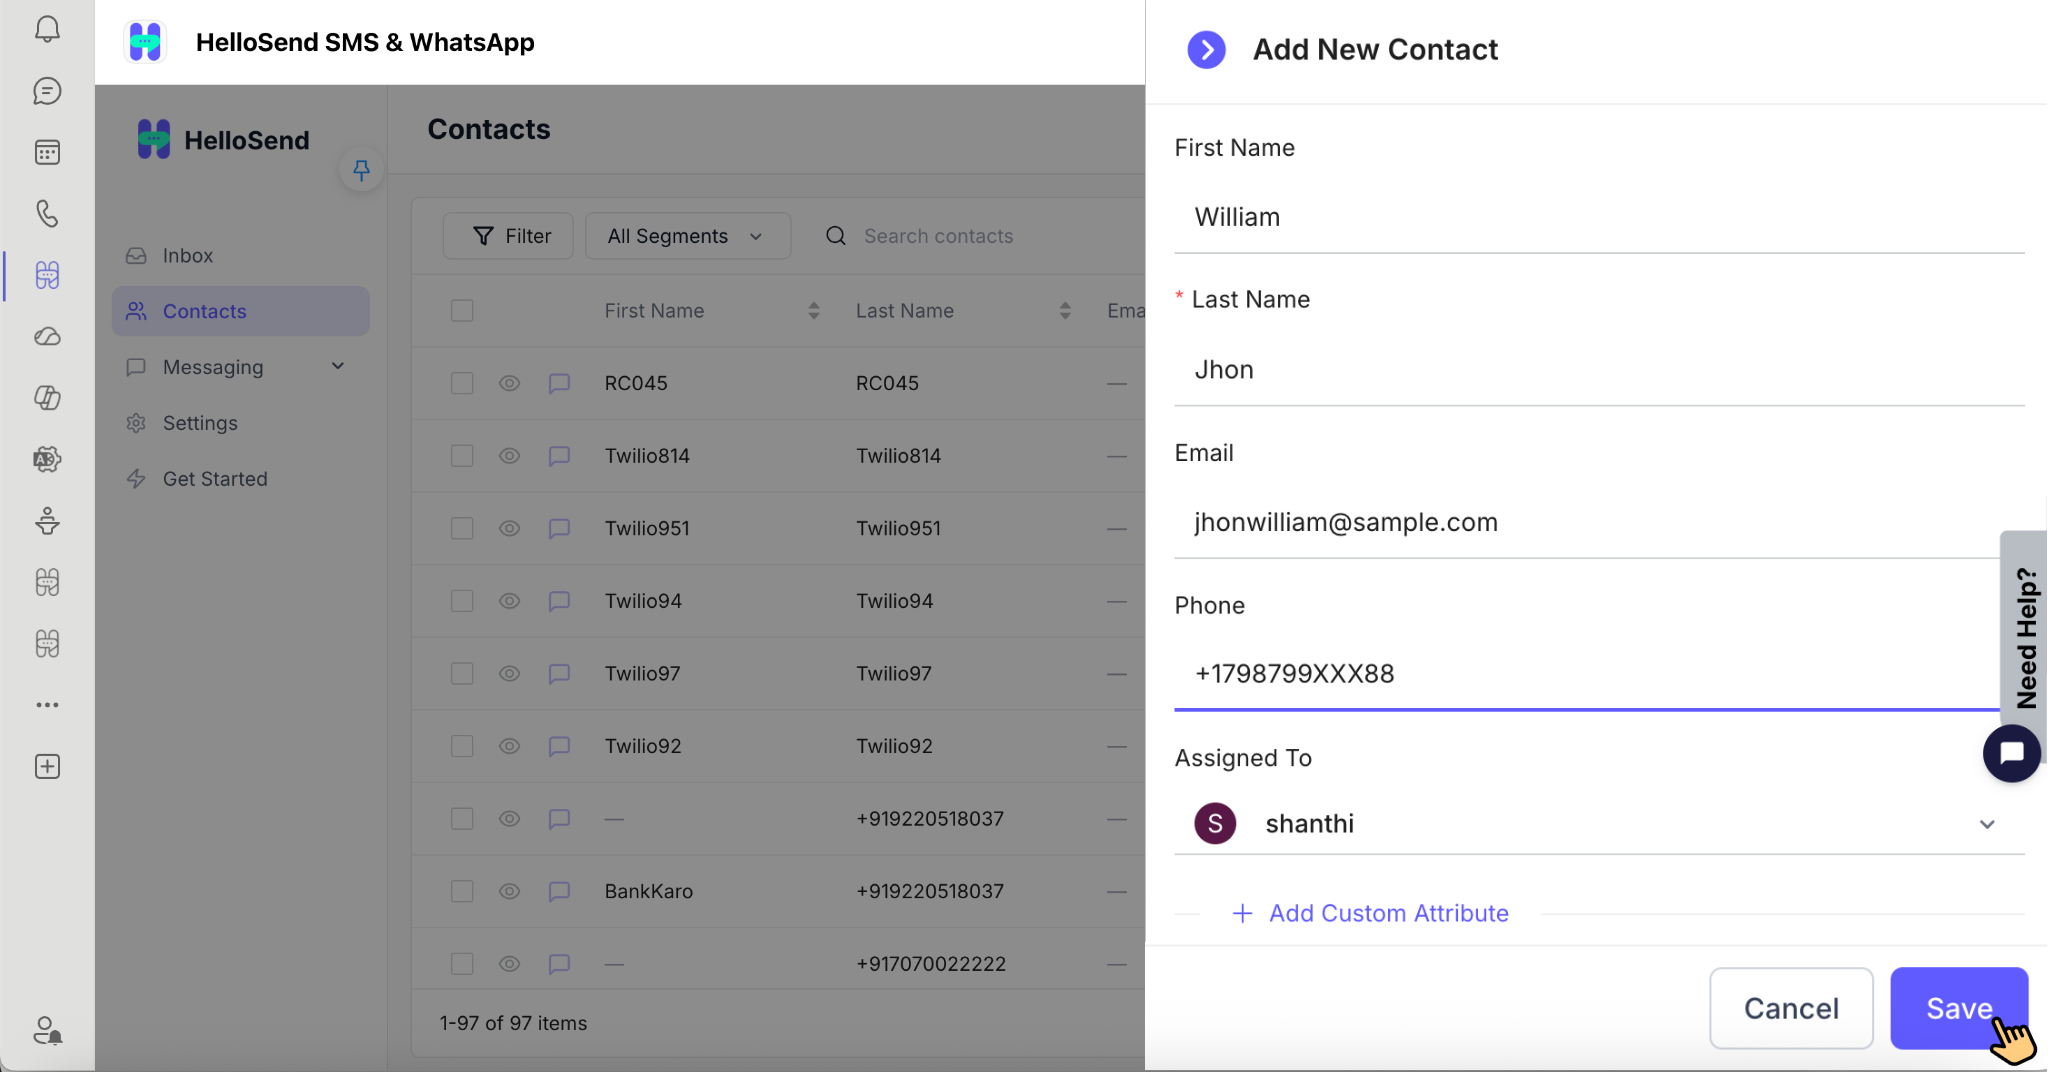
Import Instructions: Import multiple contacts into HelloSend using a CSV file to quickly build your contact list. Before uploading, ensure your CSV file contains the required contact information and is formatted correctly to avoid import errors.
- Drag and drop CSV file.
- Support for single CSV file upload . Max size 5MB .
Step 2: Match Fields
Match the fields in HelloSend with the corresponding column headers in your CSV file to ensure each contact detail is imported into the correct field. Fields marked with * are required and must be mapped before you can continue. You can also map optional fields, including custom attributes, to import additional customer information. Once all required fields have been mapped correctly, click Continue to Preview to review your data before importing.
Add Custom Attributes (Optional)
If your CSV file contains additional information beyond the default contact fields, click Add Custom Attribute to create a new field. Enter an Attribute Name, select the appropriate Attribute Type (such as Text, Number, Phone, Date, or Boolean), and save the attribute. Once created, the custom attribute becomes available for field mapping, allowing you to import and store business-specific information such as Customer ID, Membership Number, Vehicle Registration, Purchase Date, or Preferred Branch.
- Attribute Name – Enter a name for the custom field.
- Attribute Type – Choose the appropriate field type.
The following attribute types are available:
- Text
- Number
- Phone
- Date
- Boolean (True/False)
After creating the custom attribute, it becomes available whenever you create or edit contacts, allowing you to store additional information specific to your business.
Example: Customer ID, Membership Number, Vehicle Registration, Purchase Date, or Preferred Branch .
Step 3: Continue to Preview
- After mapping all the required fields, click Continue to Preview to review your contact data before importing.
- On the Preview Mapped Data page, verify that each CSV column has been mapped correctly and that the contact information, including names, email addresses, phone numbers, and custom attributes, appears as expected.
- If you notice any incorrect mappings or missing information, return to the previous step, update the field mappings, and continue to the preview again.
- Once you have confirmed that the preview is accurate, click Import Contacts to begin importing your contacts into HelloSend.
- After the import is complete, the contacts will be added to the Contacts table, where you can search, filter, organize them into segments, and start communicating via SMS or WhatsApp.
Search for a Contact
After creating a contact, you can quickly locate it.
- Navigate to the Contacts page and use the Search box located at the top of the contacts list.
- Enter the contact's first name, last name, email address, or phone number. The contacts list updates automatically to display matching results as you type.
- Select the required contact from the search results to view or update their details, edit contact information, or start an SMS or WhatsApp conversation.
- If no matching contact is found, verify the search term or create a new contact using the New Contacts option.
Filter Contacts
The Filter feature helps you quickly locate contacts by displaying only the records that match your selected criteria. You can create one or more conditions using fields such as first name, last name, email address, phone number, assigned user, or custom attributes. This makes it easier to organize large contact lists, identify specific groups of contacts, and efficiently manage customer communications.
- On the Contacts page, click Filter in the top-right corner of the contacts table to create a custom filter.
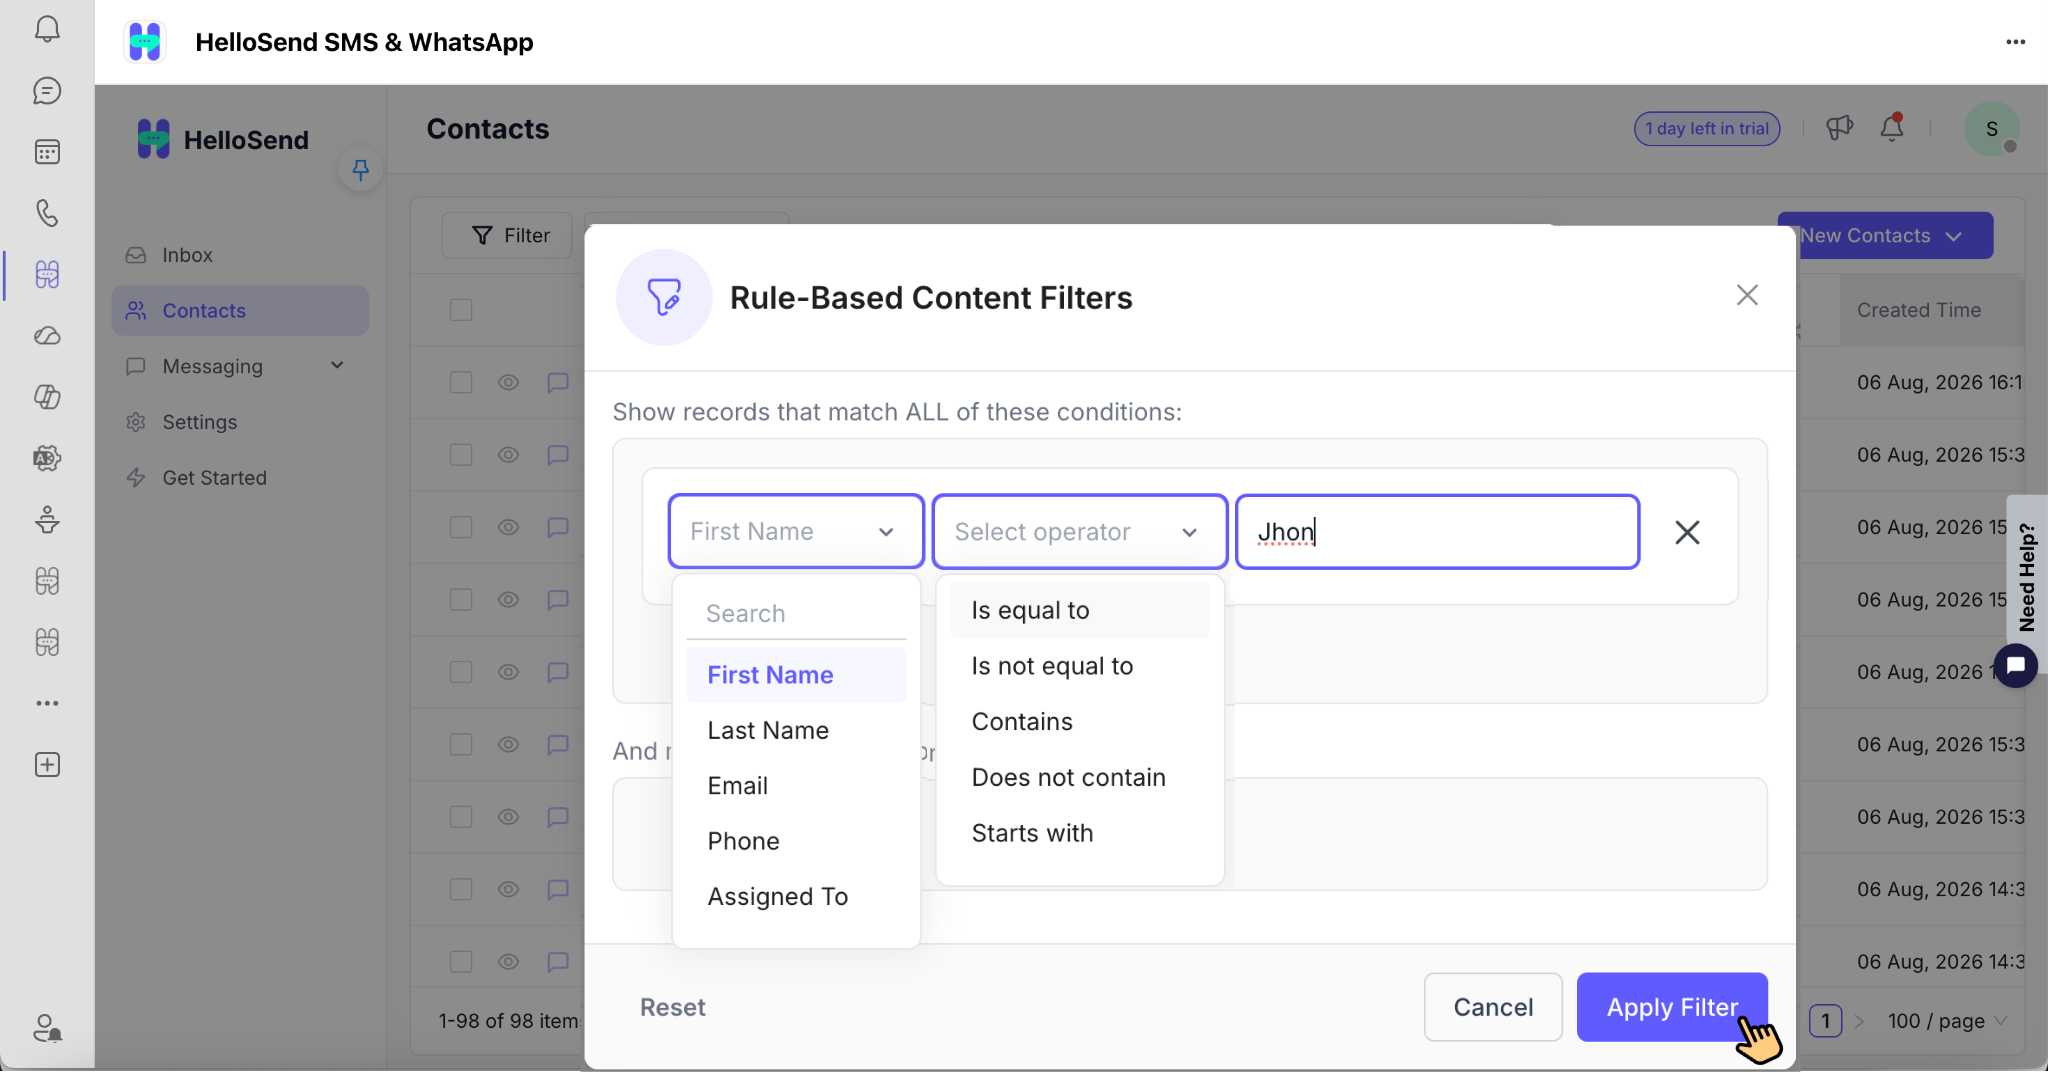
- The Rule-Based Content Filters window opens, allowing you to define one or more filter conditions based on contact fields such as first name, last name, email address, phone number, assigned user, or custom attributes.
- Use the available filter options to create rules that display only the contacts matching your specified criteria, making it easier to manage and organize your contact list.
Configure your filter conditions using the available contact fields, including:
- First Name
- Last Name
- Phone
- Assigned To
Show records that match ALL of these conditions
Use the Show records that match ALL of these conditions section when contacts must meet every filter condition you specify. Only contacts that satisfy all the defined criteria will be displayed, making it ideal for creating highly specific contact lists.
Example:
- Assigned To = John
- First Name contains David
Only contacts that satisfy all the specified conditions will be displayed in the results. To further refine your search, click Add Condition to include additional filter rules. This allows you to create more specific contact lists by combining multiple criteria, making it easier to locate and manage the exact contacts you need.
And match ANY of these conditions
Use the And match ANY of these conditions section when contacts only need to satisfy one or more of the specified filter conditions. Contacts that match at least one of the defined criteria will be included in the results, making this option ideal for creating broader contact lists or grouping contacts based on multiple possible values. You can click Add Condition to include additional criteria as needed.
Example:
- First Name = David
- First Name = John
- Assigned To = Sarah
Contacts that match any of the specified conditions will be included in the results, even if they do not satisfy every filter rule. This option is useful for creating broader contact lists based on multiple possible criteria. After configuring your filter conditions, click Apply Filter. HelloSend refreshes the contacts table and displays only the contacts that match the selected filter criteria, allowing you to quickly find and manage the required records.
Save as Segment
If you frequently use the same filter criteria, you can save them as a reusable segment. Segments allow you to quickly access groups of contacts without recreating the same filters each time, helping you organize contacts more efficiently and streamline future searches and messaging campaigns.
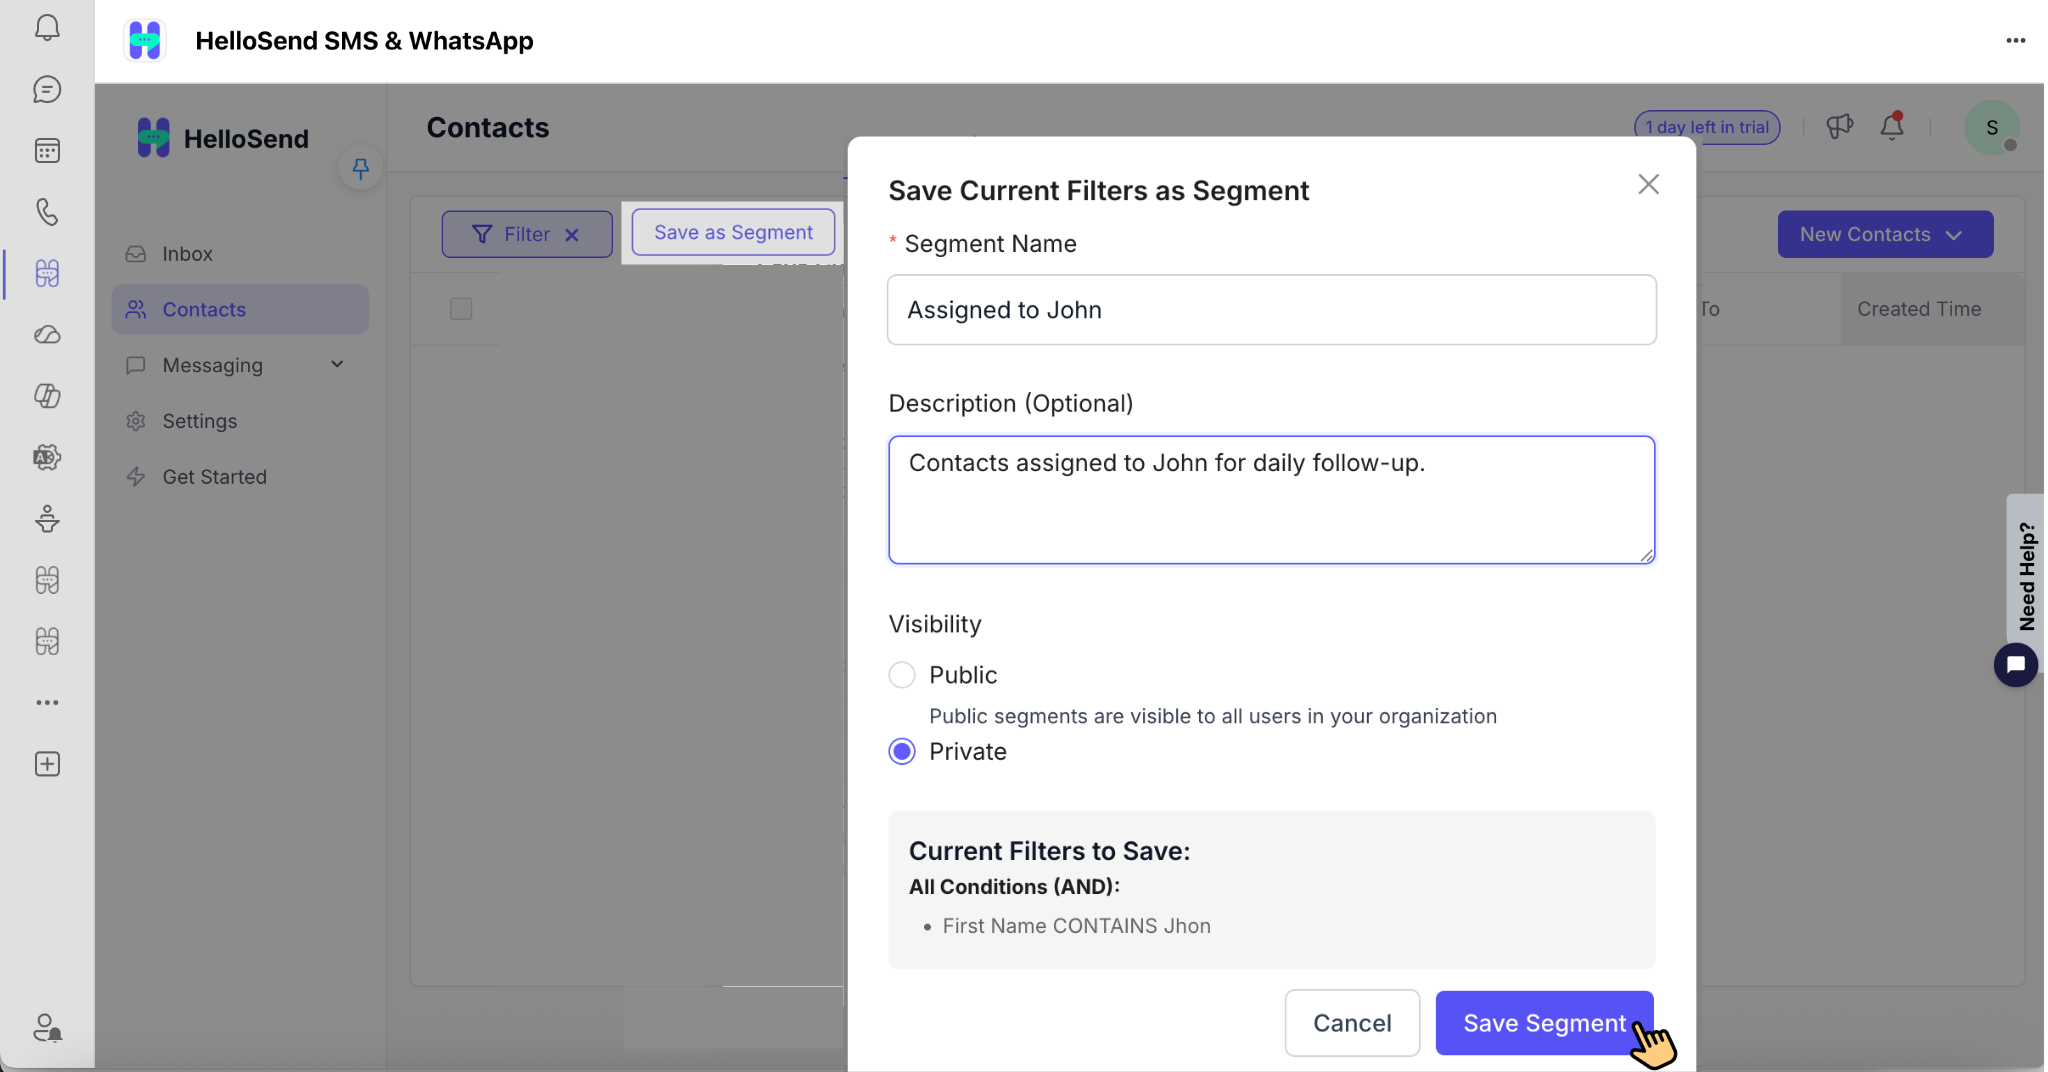
- After applying the required filters, click Save as Segment to save the current filter configuration for future use.
- Enter a meaningful Segment Name that clearly identifies the purpose of the segment, making it easy to locate later.
- Optionally, enter a Description to provide additional context about the segment, such as the filter criteria or its intended use. This can help you and your team quickly understand the segment when managing multiple saved segments.
Choose Visibility
- Public — Select Public to make the segment available to all users in your organization. Public segments can be viewed and used by team members, making them ideal for shared contact lists, common search criteria, and collaborative messaging workflows.
- Private — Select Private to make the segment visible only to your user account. Private segments are useful for storing personal filter configurations or contact groups that you do not want to share with other users.
Click Save Segment to save the current filter configuration. Once saved, the segment is added to your All Segments list and can be selected at any time to instantly apply the same filter criteria. This eliminates the need to recreate filters, making it easier to organize contacts, access frequently used contact groups, and streamline your communication workflows.
View Saved Segments
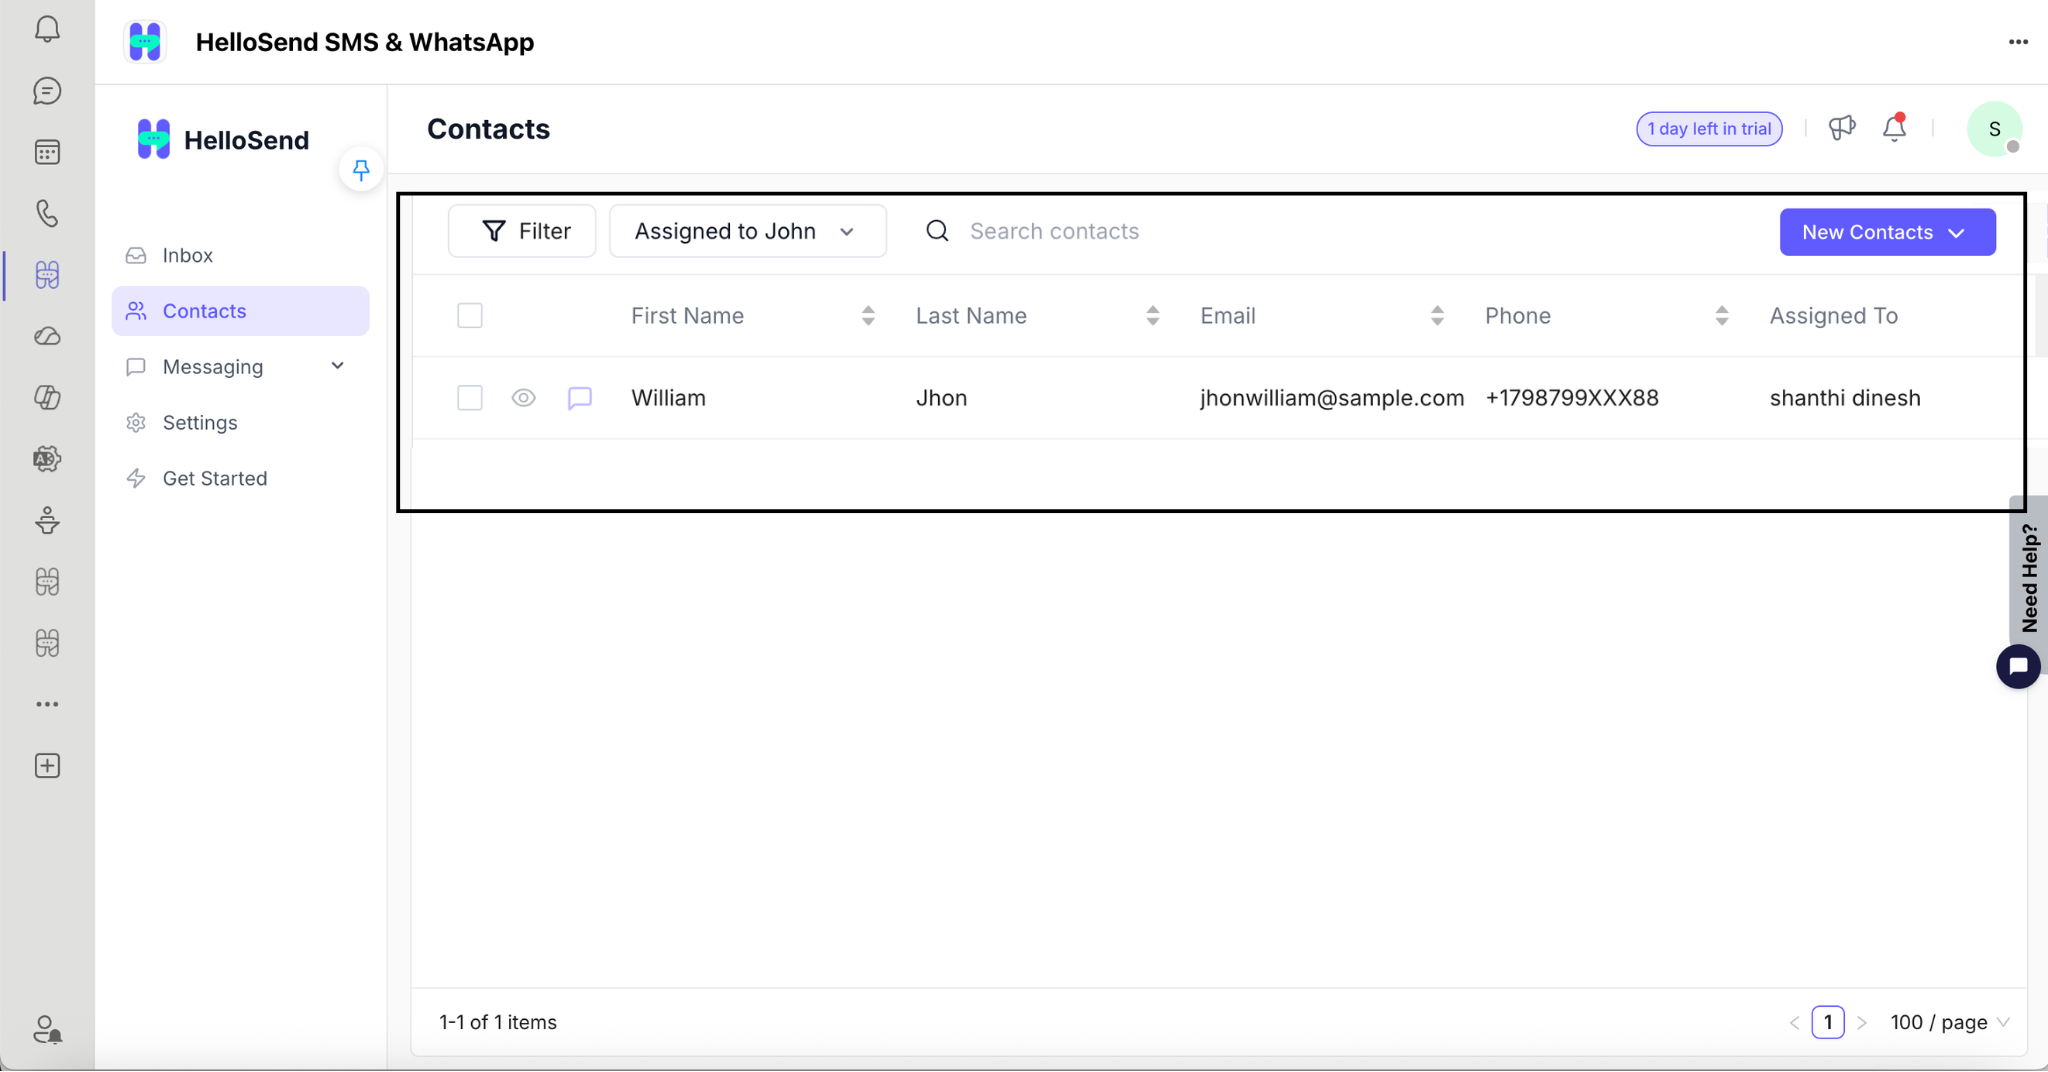
- Click All Segments .
- A list of all saved segments will be displayed.
- Select a segment to automatically apply its saved filter conditions.
When you select a saved segment, HelloSend automatically applies its associated filter criteria and refreshes the Contacts table to display only the matching records. This enables you and your team to quickly access frequently used contact groups without manually recreating filters, helping streamline contact management and customer communication.
Start a Conversation
Send a Message
After selecting a contact:
- Open the contact and choose a connected communication channel. The available channels depend on the channels configured for your HelloSend account.
- Select SMS or WhatsApp to start a conversation. If multiple sending numbers are connected, choose the appropriate number or channel for the conversation.
- Type your message in the message composer or select a predefined message template to quickly send commonly used responses while maintaining consistent communication.
- Review your message and click Send. The message is delivered through the selected channel, and the conversation is automatically recorded in the HelloSend Inbox, where you can continue the conversation, view message history, and manage future interactions.
Your conversation will immediately appear in the HelloSend Inbox within Microsoft Teams.
Tips
- Always include the correct international country code when creating contacts.
- Use Custom Attributes to store additional customer information unique to your business.
- Save frequently used filters as Segments to quickly access groups of contacts.
- Choose Public segments when your entire team needs access, or Private segments for your personal use.
- Use the search bar to quickly locate contacts by name, email address, or phone number.
Benefits
- Manage contacts without leaving Microsoft Teams – Create, update, search, and organize customer contacts directly within HelloSend, eliminating the need to switch between multiple applications.
- Import contacts in bulk using CSV files – Save time by importing multiple contacts at once and map custom fields to ensure your customer information is imported accurately.
- Organize contacts with filters and segments – Quickly locate specific contacts using advanced filters and save frequently used filter criteria as reusable segments for faster access.
- Store additional customer information with custom attributes – Capture business-specific details such as Customer ID, Membership Number, Vehicle Registration, or Preferred Branch to better organize your contacts.
- Start SMS and WhatsApp conversations instantly – Send messages directly from a contact's profile using connected SMS or WhatsApp channels, helping you communicate with customers more efficiently.
- Access conversation history from a unified inbox – View previous SMS and WhatsApp conversations in one place, making it easier to track customer interactions and continue conversations.
- Improve team collaboration and productivity – Share contacts and public segments across your organization so team members can quickly access the information they need and collaborate more effectively.
- Find contacts quickly – Search contacts by name, email address, phone number, assigned user, or custom attributes to locate customer information within seconds.
Conclusion
Adding contacts in HelloSend is quick and straightforward , allowing your team to build a centralized customer directory directly within Microsoft Teams. Once your contacts are in place, you can immediately begin communicating through SMS or WhatsApp while keeping every conversation organized and accessible.
By managing contacts and conversations from a single workspace, your team can respond faster, collaborate more effectively, and deliver a better customer experience without switching between multiple applications.